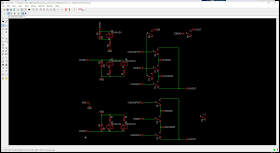
From the factory, as described in the "part one" post, the processing order is input - gain - tube - compressor - EQ - output. But in some cases, it can be desirable to have the EQ come before the compression stage. That way, one can attenuate certain frequency ranges that one would not want the compressor to react to (or conversely, boost ranges for the compressor to react to).
My initial thought was to maybe employ something as simple(?) as the venerable 4053 analog switch. Trouble is, even the CMOS version of it can only handle a maximum of 20V between its positive and negative supplies (and consequently, that also limits the maximum signal amplitude). That would on one hand, mean that the 4053 reached clipping a good few volts below where the opamps would clip at, and on the other hand, would require some "creative" way to shift the supply rails. So that was a total no-go; but what about relays? There are two on the board already anyway, so a driving voltage is at hand. A rummage through my relay collection was fruitless though, unfortunately - no DPDT ones to be found. Plenty of SPST, SPDT and DPST, but none of the kind i'd need two per channel of. And no, three SPDT's per channel are very much not an option.
But waaaait a minute... I recalled that in my Studio Konnekt 48, the attenuation pads were switched in by some latching relays. That'd be just the thing, especially since they wouldn't need to be permanently powered regardless of which position the switch is in. That being said, on second thought, "just" that sort of momentary switching might actually need a bit more complexity than i'm willing to bother with.
A quick browse through Mouser's offering showed latching DPDT relays starting at north of 1.60$ a piece - kiiiiiinda-sorta pricey, considering i'd need at least four to start with. Mostly as a "shot in the dark", i looked up "latching relay" on ebay, and quickly turned up a pretty stunning deal - a 10-pack of NAiS (nowadays, Panasonic) TQ2SA-L-12 from an Irish seller, for £4.45, still taped. I promptly grabbed two of these packs; four relays i'd need for this "switcharoo" circuit, and the rest destined for the parts stash - surely they'd come in handy somewhere down the line, for later projects.
Now, granted, the latching ability of these relays is kinda-sorta rendered moot by the uber-simplistic control arrangement i had in mind. My research and brainstorming initially led me down the path of using a CD4013B D-type flip-flop wired as a T-type (switchable with only a momentary pushbutton). A neat / fancy idea, but given the maximum of 8mA or so of current sourcing and sinking capability of the chip, that would've needed some sort of H-bridge arrangement to drive two relays at once (each drawing 8mA on its own), so that went out the window quite promptly.
As such, i'm sticking with my initial low-tech solution, albeit with a slight twist. The "low-tech" part is made up of a bog-standard SPDT switch per channel. The "twist" is as follows: connecting one end of the relay coils permanently to ground, connecting the other end to the common terminal of the switch, and the +15V and -15V rails to the two sides of the switch. That way, with the switch in one position, the relays will be powered by 15V "in one direction", as it were, and when flicking the switch, the voltage applied to the coils will be the opposite way.
 |
| Yellow wire goes to one end of the relay coil; pink and grey wires are +/-15V |
Don't freak out, it's perfectly safe, from several points of view. Yes, the coils on this particular model are indeed nominally rated for 12V, but in the datasheet (specifically on page 3) it's clearly mentioned that they support up to 150% of the nominal voltage, at 20C ambient. 15V is "only" 125% of nominal, so well within the aforementioned spec. Also, on page 9, in the first graph of section 5, it's shown that applying 125% of the nominal voltage would cause a 20C rise in the core of the relay - looking at the 0A solid line, since these will only be switching audio signals, and as such, carrying no significant current.
Routinely, an antiparallel diode is placed across the relay coil terminals, to snub the inductive voltage spike that comes about, when de-energizing said coil. Now, since the voltage across these relays' coils will be, in effect, reversing, that solution's a no-go. The "tweak" that i've chosen to make it work, though, is a back-to-back pair of Zener diodes - 18V should do just fine for the task.
Took me a little while, but i also managed to figure out the best(?) way to do the signal routing / switching between the relay contacts, as well. The resulting board should come out around 65x40mm (2.5x1.5in, give or take).In the mean time, the relays arrived too. Since nowadays the branding is (or should be) either "Panasonic" or the Matsushita "[M]" logo, my guess is these are some NOS (New, Old Stock) components - i don't mind, these are quality parts, and have never been used. The tape carrier's not melted, so they haven't been subjected to high temperatures, and as such, they should be fine for the purpose.
Just for kicks, i did some quick measurements on one - coil resistance is actually a bit over 2Kohms, and current draw is just 6mA (versus 1.4Kohms and 8mA as per the Panasonic datasheet). Maybe that's just a "generation" difference? Either way, that only makes my earlier calculations that much more conservative.
That being said, i guess there's nothing stopping me from chucking in a couple of resistors in series with the relay coils, they're 1440ohms each, themselves. Running some quick numbers, adding a 390ohm resistor in series with each relay coil would drop the roughly 3V difference (3.2V, to be more precise). I went with one resistor per relay coil to ease routing, sort of. Either way, it's a one-off, so no biggie either way.
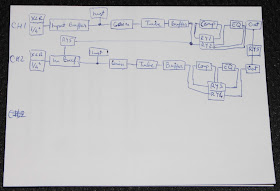
Ehrm... Well, since i'll be tacking on this board inside the preamp anyway, one extra relay on it won't make much of a difference, right? One of the switches will be doing the connecting of channel 1, between "output buffer of the tube" and "input summing of channel 2", and the other side, connecting the output of channel 1 into the output level control of channel 2, rewired as a blend control. It might sound a bit convoluted, but it makes sense, if you think about it a bit.
I know, all these wordy descriptions must have your head spinning like a top, but i'll try to sketch a diagram, just to try to make it a tiny bit clearer than mud. "RY" is one of the (semi?)standard designations for relays; RY1 and RY2 handle the routing / switching for channel 1; RY3 and 4, the same for channel 2. RY5 controls the channel daisy-chaning and output mixing. I can only hope my "long-forgotten" handwriting doesn't turn out to be (TOO) illegible...
So then, on to the practical realisation of this franken-mutilated-hybrid-whatever. I went with my "classic" manual-scoring of a plain old single-sided copper-clad board. I juggled the relay pin assignments and signal routing to try to make the circuit-board as simple to make as possible. For the sake of reliability, i covered most of the bottom of the board with 3M 9087 double-sided tape. To make double-sure, i also used some clipped-off diode legs, and connected the ground side (bottom edge of the board) as well as the top edge of the board (to which the "no connection" pins 5-6 of the relays were soldered to), to the appropriate ground pads, through the pre-existing capacitor-leg-holes (remember that unpopulated power supply area?).
I know, it looks... kinda messy, to say the least, but hey - it's on the inside of the case, and i'm a function-over-form kinda guy when it comes to things like this anyway, so... I've got better things to worry about. Like signal integrity, for example.
I used shielded cables for all the interconnects, but in order to avoid creating ground-loops, i only connected the shielding braid at one end (not on the relay board). In a couple of cases, i didn't have an accessible grounded component leg, so i made one. Drilled a 1mm hole through an adjacent groundplane-covered area of the board, scraped off some of the soldermask, added some flux & solder, and poked a scrap resistor leg through.
The area in the photo above also depicts the channel 2 sorta-kinda-"blend" control. After double-checking in LTspice (and subsequently confirming) that the new setup would indeed work as i imagined, the solution was quite simple. The "Output" level pot was connected as a variable resistor (wiper connected to one end), in the feedback loop of an opamp. I severed the wiper-to-end connection on the board (yellow line in the diagram below), so with nothing connected to the now-free end, it would still behave just as before. To the free end i connected a 10K resistor, through which the signal from one of the output buffers of channel 1 can be fed into (via one half of relay RY5).
Other than that, the wiring involved "breaking into" the signal path at the three key points, on each channel. As such, two wires from virtually the same point needed to be run to the relay board, from between the tube buffer and the compressor input, the compressor output / EQ input, and from the EQ input / output level control stage, respectively.
It took me a number of hours spread across a couple of days, but i DID manage to make this whole demented idea of a project come true. One way or another... And yes, i know, it looks like the Flying Spaghetti Monster crash-landed into i-don't-know-what, but it does what i want it to, and that's all i really care about, at the end of the day.
And for good measure, considering i envisage this thing being used (also) as a bass guitar preamp, i decided to add a couple of ground-lift switches, for the XLR outputs. In live-gig situations, it's a damn near critical feature to have, to avoid ground-loops.
In case you were wondering, yes, it still works just fine. The relay-channel-daisy-chaining works fine, the rewired-blend-control works fine, and so does the processor-rearranging. Nope, i'm not in the least worried about having "ruined the resale value" of this thing - it barely had any to begin with. But have i concocted a flexibly-featured "texture box", a (hopefully) workable bass DI / preamp? I'd like to think i have. Very much looking forward to giving it a spin, next time we have band rehearsals...


No comments:
Post a Comment